"If necessity is the mother of invention, then laziness is the father." - attributed to Allen Dale
Sometime ago I've read about OpenSprinkler (source code) and I had to try it, I was a bit dissapointed when first I saw it worked on Raspberry PI Zero, but then I saw other boards it might work on, until I've found a port to ESP8266 and decided to give it a go, but I should also note there's an official ESP8266 OpenSprinkler with Source Code.
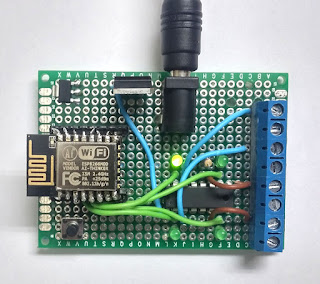
The design I chose to start with is pretty primitive, I didn't want any LCD or RTC, ESP8266 can get the time though NTP so I didn't see much use to it, for the solenoid drive I chose L293D, which should be more than enough for home valves with 600ma output (and 1.2A for peak current).
Throw in some terminals, a few leds, a pcb and a voltage regulator and you have a working prototype.
Which ESP8266 you ask? there are so many, if you need less than 8 stations, you can use the cheaper ones for about $2.
Just remember to modify the pins used for each station, put a mosfet or a driver between the MCU, the pins are configurable through Pins.h under PIN_STN_S01 - 16 (on board with more pins, the version I have, has only 8).
When I first tried to build OpenSprinkler I've encountered a few issues, first, I had a very old NewLiquidCrystal library, which doesn't work on ESP8266, trying do download a new version through downloads doesn't solve the problem because its not there, you'll need to download either through Download Repository or through Mercuial clone.
After fixing that problem, I've started to configure the build to my needs, I've fixed the OPENSPRINKLER_ARDUINO_FREEMEM flag so it will report how much memory is available, I've reduced the number of stations to 4, changed the location and remove the default NTP IP since it wasn't working.
I've also found a few problems with WifiManager, it seems the development was not complete, so I've added the debug messages, a reset command, renamed the AP name and finally add ESP.eraseConfig and dump ESP info into the debug log.
Another modification I made was to remove all the unneeded buttons since it was mostly needed for the LCD, I did add one button so when the board starts with the button pressed it will reset all setting to defaults.
A few things about this build:
- Voltage regulator - I didn't have a 3.3v voltage regulator that could work on 12v, I've had to get it down to 5v (with 7805) and then again to 3.3v (with A1117).
- ESP8266 does have a breakout board, I didn't have one available so I decided to solder it straight on some pins.
Now for the fun part, testing it :-)
Source - https://github.com/drorgl/OpenESP8266_Sprinkler/tree/ModAfterUpload/OpenSprinkler_Arduino_V_2_1_6


Hi,
ReplyDeleteNice artikel, i like it.
Looking the Pictures, it so simple, i want to try it with WeMos D1 Mini.
Can i have the schematic?
and can i use Shift Register 74HC595? i have a lot of it lying around in my place.
i hope you can help me...
Thanks....
Best Regrads,
Teguh.
Hi...
ReplyDeleteI have try to compile your github using Arduino, but there a lot of error.
I Use Kubuntu Linux 17.04 64bit, so the file name is case sensitif, the path in linux using / but under window using \
And there is alot more error.
I will be glad if you could put the binary like pbecchi and give the library you use and put it in your github.
But it seem you are busy, so thanks anyway.